Home » 2023
Yearly Archives: 2023
HVAC Preventative Maintenance
HVAC maintenance is an integral part of property maintenance for both residential and commercial properties. A computerized maintenance management system can help you build an HVAC preventative maintenance program and empower your team with insights that can improve the bottom line of your business.
Clogged air filters can pump dust and allergens into the system, causing a decrease in the efficiency and quality of your home’s air. Using the right filter every 3 months can prevent these issues from occurring. Click here at https://comfortprosheatandair.com/ to learn more about HVAC maintenance.

Preventative Maintenance
Just like you get your car tuned up regularly or rotate the tires, HVAC preventative maintenance is essential to extend the life of your heating and cooling system. It also helps you save money on energy costs in the long run.
Preventative maintenance involves the inspection, cleaning, and basic upkeep of equipment and machinery at scheduled intervals. While it is not possible to avoid the occasional breakdown of any kind, this type of maintenance will minimize the likelihood of a breakdown occurring, thus reducing repair and replacement costs.
The simplest form of preventative maintenance is simply setting a schedule—often based on manufacturer recommendations—and sticking to it. This can include lubrication, changing filters, and other tasks that require little to no human intervention. This is often the most efficient way to maintain a piece of equipment and it allows technicians to be focused on problem areas that may require a more comprehensive look or repair.
For the most effective preventative maintenance, property owners should work with service providers to create a detailed checklist that identifies all of the items the technician must check and perform. This will ensure that no area of the equipment is left unattended, and it can help to determine how much time and effort the company will spend on each visit. It’s also a good idea to review different payment options to see whether a fixed yearly contract or pay-as-you-go plan fits your budget better.
When a technician completes the scheduled maintenance tasks, they should take the time to explain their findings to the property owner so that he or she is aware of any issues that need to be addressed and why. The property owner will then be able to decide how quickly these repairs should be made and will be less likely to encounter costly surprises down the line.
It is not only the cost of a breakdown that can be avoided with routine maintenance, it’s the resulting impact on productivity and the potential safety hazards that come along with it. This is especially true in commercial properties that must contend with extreme temperature highs and lows regularly.
Scheduled Maintenance
If you’re a homeowner, HVAC maintenance includes a lot of small tasks that can help your system function better. Taking steps like changing the air filter or cleaning the vents can make it easier for your HVAC system to distribute cool or warm air evenly throughout your home. This can prevent rooms from getting uncomfortably hot or cold and allow you to use your energy more efficiently.
Another reason to keep up with HVAC maintenance is that it can reduce your energy bills. When a system is not properly maintained, it can run inefficiently and consume more energy to maintain the same temperature. However, if you perform routine maintenance with an experienced technician, your system will be more efficient and use less energy.
Finally, keeping up with HVAC maintenance can help you stay covered under the warranty for your system. Many manufacturers require proof that you have performed a certain number of annual maintenance tasks before they honor your warranty. Performing the required maintenance can also help you avoid expensive repairs down the road.
Maintenance problems can have a huge impact on your facility’s productivity and the satisfaction of your building occupants. For example, a malfunctioning HVAC system can cause some areas to be too hot or cold, which can lead to discomfort and even illness. In addition, the failure of a key piece of equipment can disrupt workflows and delay projects.
A computerized maintenance management system solution that helps you optimize your scheduled maintenance can reduce the risk of costly failures. Many providers offer a state-of-the-art platform that allows you to create and manage a complete scheduled maintenance program. This can include both preventative and emergency maintenance tasks. The platform will also provide visibility into your maintenance operations and empower your teams to make smarter decisions.
For more tips on optimizing your scheduled maintenance, reach out to the team today. We can help you create a system that will catch minor issues before they become major problems, save you money on energy bills, and give you priority scheduling for all of your HVAC repairs.
Preventative Repairs
As a business owner or property manager, the HVAC system in your commercial space is one of your most critical components. It’s used to keep your employees and tenants comfortable, customers happy, and the spaces in which you operate a safe environment. Without a properly functioning HVAC system, your business could quickly lose revenue and even jeopardize the health and safety of those you serve.
That’s why preventative HVAC maintenance is so important. It helps to minimize the risk of major repair bills and extends your HVAC system’s expected lifetime. While it may be tempting to use the “if it ain’t broke, don’t fix it” mindset, it’s more financially responsible to invest in preventing future issues rather than waiting until they arise.
Regular maintenance by a professional service technician can identify small problems and stop them from growing into expensive headaches. It can also improve energy efficiency and help the system last longer.
If you don’t schedule preventative maintenance, your unit may begin to overwork itself to keep up with heating and cooling demands. This can cause several problems including dirty coils, misaligned pulleys, and algae build-up in the drain pan. The system’s ductwork, vents, and cabinets may also need to be cleaned. Additionally, faulty electrical connections can lead to unsafe operations and higher utility bills.
In addition, if you don’t perform regular maintenance, you may not be eligible for your warranty coverage. Many manufacturers require that you provide proof of annual maintenance to ensure your system is covered under the warranty.
When you hire a professional technician for your maintenance, they will thoroughly inspect your system and its components. Then, they will clean each part and make necessary repairs to keep everything in working order. This can stop clogged condenser coils from corroding and keep the system from overworking itself, resulting in lower energy bills and improved performance. Additionally, a professional will clean evaporator coils and air handler blowers to keep your space free of dust, mold, and bacteria. In addition, they will clean or replace filters to keep the indoor air quality at a high level.
Emergency Repairs
Keeping up with preventative maintenance can significantly reduce the need for emergency repairs. That said, no matter how well you take care of your HVAC system, every component still has a lifespan and is subject to normal wear and tear. That’s why it’s important to know what constitutes an emergency repair so you can be prepared if your HVAC system breaks down.
Generally, emergencies involve anything that can’t be stopped by cutting the power to your HVAC system or is a safety issue for you and your family. This includes issues that affect your air quality, electrical issues, problems with ventilation, or leaks of any kind.
You can also be proactive and keep the need for emergency repairs at bay by having your HVAC technician clean your vents and air ducts regularly. These areas are hard to reach and often get ignored, but they can be a major fire hazard and may lead to poor air quality.
Other HVAC maintenance tasks that can help prevent the need for emergency repairs include checking and replacing your air filter, examining and cleaning the condensate line, and checking and repairing any wiring or connections. These are simple, affordable, and quick jobs that can be done on a routine basis to avoid the need for costly repairs in the future.
If you do find yourself amid an HVAC emergency, you should try to document any strange smells or sounds and remember any other symptoms. This will help the technician diagnose and fix the problem more quickly. Also, if you have any sick family members who need to stay in a warm or cool house, let the technician know so they can prioritize your home’s heating and cooling needs.
Getting your HVAC system inspected and maintained by qualified technicians is one of the best ways to minimize the need for emergency repairs in the future. Besides being cost-effective, it will also save you money in the long run as it will help your system last longer and operate more efficiently. And if you’re looking to save even more money, consider a service plan that will include scheduled inspections and maintenance for the entire year.
Water Heater Repair Tips
If your water heater stops producing hot water, check first to make sure that electricity is being delivered. A tripped circuit breaker or blown fuse could be the culprit.
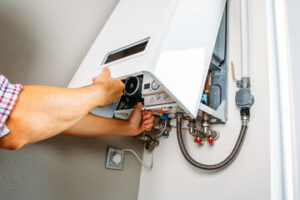
If you own a gas water heater, relighting the pilot light may solve your problem. However, if you need some help from the experts, contact Water Heater Repair Tampa.
If your home’s water turns a strange color or looks cloudy, it can be alarming. These changes in water quality may indicate dangerous contaminants or a problem with your water heater that requires immediate attention. Depending on the color of the discolored water, you may need to flush your water heater or install a whole-home filtration system to solve the problem.
Discolored water can be caused by a variety of reasons, from temporary disturbances in the public water supply to problems with your plumbing pipes or the water heater itself. If the discolored water only affects your hot water, it’s likely due to sediment stirring up in the municipal water pipes that run to your house or the copper and iron water supply lines that connect them. To help determine the source of the problem, check whether the discolored water is in both your hot and cold water supplies.
Water heaters can also become discolored when they’re older and in need of maintenance or repair. The water heater tank accumulates mineral deposits on the bottom and inside the walls, and these can cause the water to turn a rusty or brown color. Regular water heater flushing helps eliminate these deposits and extends the water heater’s life expectancy.
If the water in your home is discolored, our plumbing inspection experts can assess the situation and recommend the appropriate water heater repair or replacement. While a change in water color can be alarming, it’s typically not dangerous, except in the case of reddish-colored discolored water that indicates the presence of rust particles.
Rust is not toxic, but it can be unhealthy and make the water taste bad. This can lead to health issues, so removing the rust is essential. Our plumbers can recommend the best solution, which usually involves replacing older pipes that may be causing this problem. For example, if your discolored water is due to a leaky tank or valve, our expert plumbers can fix the problem and ensure that it doesn’t happen again. In addition, if the water heater is approaching its end of life, it’s best to replace it immediately.
Tank Corrosion
Corrosion is a chemical reaction that takes place when metal, water, and oxygen are combined. It results in the creation of rust, which can cause problems for your home’s water heater and piping systems. Fortunately, water heaters come with multiple features designed to stave off corrosion. However, those systems cannot stop corrosion from eventually taking hold. If you notice signs of a corrosion problem, it’s important to schedule water heater repair immediately.
The most common sign of a corroding water heater is red, orange, or brown discoloration in your home’s hot water supply. The discolored water is caused by rust particles breaking off from the tank and traveling through your pipes to your faucets. The water is also more acidic and prone to clogging because of the rust.
A corroded water heater tank can also become brittle and develop leaks as a result of the rusty interior liner. These leaks are difficult to detect and can be extremely dangerous because they could allow flammable sediment from the tank to enter your home’s plumbing system.
If you notice rust on the bottom of your water heater tank, this may be a sign that your sacrificial anode rod has failed. This is a rod crafted of magnesium or aluminum that runs down through the tank. The anode rod attracts corrosive metal particles away from the rest of the tank, essentially “sacrificing” itself to save the rest of the heater. If the anode rod has completely corroded, it must be replaced with a new one as soon as possible.
Conventional wisdom holds that once a water heater tank starts to show signs of corrosion on the inside or outside, it’s time to replace the system. This is because once corrosion starts to set in, the tank will begin to leak shortly afterward.
The good news is that preventive maintenance with a professional plumber can help you avoid this problem altogether. By having a professional inspect your system and make necessary repairs, you can keep your tank from corroding before it’s time to be replaced.
Tank Leaks
A water heater tank leak can lead to flooding and expensive repairs. If yours is leaking, turn off your gas and water supply and call a professional as soon as possible. You might be able to stop the leak from getting worse with some basic troubleshooting, and it’s worth trying.
Check the drain valve to make sure it is closed and that there is no water leaking from it or around it. If there is, the valve is likely clogged and needs to be replaced. You should also check the temperature-pressure relief valve (T&P). If it’s leaking, it will need to be replaced.
If you’ve found no evidence of a leak, the problem is most likely with the internal steel tank itself. This is a safety device that releases pressure from the tank when it gets too hot, and you will usually notice water under your water heater if it has failed. The good news is that this can be repaired, and most professional plumbers will have a replacement in stock.
Another common problem with tank water heaters is a faulty thermostat or cutoff switch. If you’ve checked the T&P valve and found no sign of a leak, then it is almost certainly an electrical problem with either the thermostat or cutoff switch.
Both of these can be tested by turning off your electric water heater, shutting off the water supply valve to the tank, and then checking to see if the pilot light is still lit. If it’s not, then the orifice may be clogged and will need to be cleaned by your local plumber or gas company.
If yours is a gas-powered water heater, then you will need to shut off the water valve at your home’s main water line, which should be located within a few feet of your home’s gas meter. You should also turn off the gas to your water heater by turning the dial on the gas valve, which is typically a large round handle that looks like a wheel. This will need to be turned clockwise in order to shut off the water and gas supplies.
Sluggish Performance
If your water heater is producing hot water but seems to be running sluggishly, a plumber will have to take a closer look at the unit. Often, this indicates a problem with the heating element or a malfunctioning thermocouple. If this is the case, it will likely cost a considerable amount to repair.
In some cases, this can also indicate that the unit isn’t sized properly for your household or family. In this instance, it would be smart to invest in a newer, larger unit.
On the other hand, if your water heater appears to be in good working order but is producing little to no hot water at all, you could have a problem with your gas valve. In this case, a professional will need to come out and replace the thermocouple or gas control valve.
You can save yourself some money by relighting the pilot light on your own, but please follow the safety instructions included with your water heater carefully. Doing this without following proper safety guidelines can lead to serious injury and damage to your water heater or other appliances.
In addition to relighting your pilot light or resetting the circuit breaker on your electric unit, you can try draining the tank. This is something that most plumbers will be more than happy to do for you, though it will probably incur their normal hourly rate. This is a relatively easy and affordable repair. In fact, it’s a maintenance step you should perform regularly to ensure that your unit is functioning at optimal performance.
eCom Elites Review
Everywhere you look, you hear about people making a fortune through dropshipping and other e-commerce models. It’s definitely a gold rush, but not everyone will make it.
Franklin Hatchett is upfront about this from the start in his backstory video, and that’s a good thing. Unlike other gurus, he doesn’t try to hide his strategies. Read on Scamrisk for more information.
What are eCom Elites?
The eCom Elites course was created by Franklin Hatchett to teach people how to make money online through dropshipping. The course consists of 12 modules that cover a variety of topics, including Facebook ads, Google ads, Shopify, social media marketing, email marketing, and getting free organic Google traffic. Franklin believes that if you follow his exact steps, you can earn $10,000 or more per month.
The first module in eCom Elites covers the basics of setting up your Shopify store. It also teaches you how to choose the right theme for your store and how to optimize it. This will help you maximize your profits and increase your conversion rate. The course also includes video tutorials on how to use the various features of Shopify.
In the next module, Franklin covers the different ways to promote your Shopify store using Facebook ads. He teaches you how to target specific audiences based on their age, location, and job. He also explains how to use the Facebook Pixel and how to set up your Facebook ad account.
The next module covers how to create a high-converting sales page for your Shopify store. It also teaches how to write product descriptions that are persuasive and compelling. In addition to this, the module also teaches you how to use keywords and search engine optimization (SEO) strategies to drive free traffic to your website.
Another important module in eCom Elites is the one on creating product videos. This is a great way to improve your product’s visibility and increase sales. The course also teaches you how to use tools like Screencastify and iMovie to create professional-looking product videos.
eCom Elites also covers how to find and partner with Instagram influencers to promote your products. This is a great way to boost your sales and grow your brand. The course also teaches you how to build an affiliate program and how to track your sales.
Unlike other dropshipping courses, eCom Elites has an extensive section on SEO. Franklin provides a comprehensive overview of SEO and covers all the major aspects, including keyword research, competitor analysis, and link building. The only downside is that the training on SEO is a bit out of date, but it still provides useful information for beginners.
Does eCom Elite work?
eCom Elites is a dropshipping course created by Franklin Hatchett, a renowned entrepreneur and digital marketer. It is designed for new entrepreneurs to help them set up a successful Shopify store and start selling products. The course also teaches them how to use different marketing strategies to drive traffic to their store. It consists of nine modules with more than 200 videos and includes a Facebook mastermind group. The cost of eCom Elites is affordable, and it comes with a money-back guarantee.
The first module in eCom Elites introduces the basics of Shopify and how to create a store. It also covers important topics like finding profitable products, choosing suppliers, and managing inventory. The second module focuses on finding the right customers and promoting your product to them. The third module teaches you how to use paid advertising on social media platforms. This is an essential component of any online business, and Franklin explains the best ways to do it.
Finally, the fourth module covers the importance of SEO and how to optimize your website. It also teaches you how to build an email list. It would have been helpful if this module included more information about using Google Ads, since it’s one of the most effective ways to grow your sales.
In addition to these modules, eCom Elites also has an extensive video library on topics like affiliate marketing, podcasting, and Instagram influencer marketing. It also provides valuable resources for its members, including a database of profitable products and a free Facebook group where Franklin answers questions.
The eCom Elites course is similar to other ecommerce courses by Adrian Morrison and others, but it offers more comprehensive training in areas like search engine optimization and chatbots. It also has more videos on each topic than other similar courses. For example, the eCom Elites Ultimate version has 17 videos on Google ads compared to just one video in Adrian Morrison’s Ecom Success Academy course. Furthermore, eCom Elites includes a bonus software tool for finding products called Sizzle Product Sniper that ESA does not include.
Does eCom Elite cost money?
There are two packages available for eCom Elites: the Standard and the Ultimate. The Standard costs $197 and includes everything from the online course to weekly Q&A sessions and access to a private Facebook group. The Ultimate package is $100 more and includes everything in the Standard plus Google SEO training, chatbot training, and premade sales funnels. Both courses are backed by a 30-day money-back guarantee.
The eCom Elites online course was created by Franklin Hatchett, a New Zealand-born entrepreneur who has built several dropshipping stores that sell backpacking gear. He has also made his share of YouTube videos and is an active member of the digital marketing community. His success is due to his hard work and dedication. But he also warns that it will take time and effort to achieve results.
eCom Elites is an online course that teaches you how to set up and run a successful Shopify e-commerce store. It is designed for beginners, and there are no prerequisites. The course is a step-by-step guide that will walk you through the process of creating your own store from scratch. You will learn how to choose the right products, set up your store, and drive traffic using Facebook and Instagram ads. The course is updated regularly to include the latest techniques and trends in dropshipping.
In addition to the course, eCom Elites also offers free updates for life and a private Facebook group. The program will teach you how to get started with a profitable Shopify store and earn passive income. In addition, the program will teach you how to optimize your Shopify store for search engines and increase profits by using paid advertising methods.
This e-commerce course is one of the best dropshipping programs that you can find on the internet. Its creator, Franklin Hatchett, has many years of experience in business and knows how to help you succeed. He has also been featured on many popular blogs and podcasts.
The eCom Elites online course has many benefits that make it worth the investment. It is a comprehensive program that will give you all the tools you need to start a successful online store. It is also a great option for people who don’t have any prior experience in eCommerce or website design.
Is eCom Elites a scam?
eCom Elites is a dropshipping course that was created by Franklin Hatchett, an entrepreneur and digital marketer. The course teaches newbies how to set up a Shopify store and start selling products online. It also covers digital marketing in detail, including managing Google ads. The course is divided into nine modules, each containing a number of videos. It is available for $197 or $297. Franklin also offers a premium version of the course that includes an already-done sales funnel and two of his best-selling books.
eCom Elites is a legitimate business, and Franklin has many successful students who have made five or even six figures per month. However, it is important to note that the success of each student depends on how hard they work and whether they stick with it.
The course starts with a video from Franklin himself explaining who he is and what eCom Elites is all about. He then dives into the training and explains how it works. The course consists of video lessons that cover everything from setting up an eCommerce store to driving traffic to the store. It also teaches you how to find profitable products and create effective ad campaigns.
Another thing that sets eCom Elites apart from other dropshipping courses is its focus on low-ticket items. This is a great way to make money online without having to spend a lot of money on inventory. The course also includes a product-finding tool that makes it easy to find high-profit items.
While eCom Elites is not for everyone, it is an excellent option for those who are interested in learning how to make money online with a Shopify store. It is especially useful for people who want to break away from the traditional model of exchanging their time for money. Moreover, the course is also ideal for those who are looking to travel or live a digital nomad lifestyle. This is because owning an e-commerce store can provide you with a steady income. It can even replace your full-time job if it becomes successful enough.
Laminate Flooring Installation Tips
Many DIY enthusiasts choose laminate flooring because it’s very easy to install. The process is also inexpensive. It’s important to work efficiently and correctly every step of the way. However, you must know a few things before starting the project. This article includes how to prep the floors and lay the laminate planks properly.
 A good preparation process can make a big difference in the success of a project. It involves a lot of planning and organization and is about something other than rushing things. It’s about taking time to understand the problem and figure out how to solve it efficiently.
A subfloor is the base layer of a flooring project and must be prepared correctly to avoid problems down the road. If the floor is made of concrete, grind off any high spots and use a leveling compound to fill in low spots. It’s also a good idea to remove any carpeting or padding, as these may be too thick and can cause problems down the line.
The best way to prepare your subfloor is to clean it thoroughly and dry it out completely. This will ensure that there are no dusty or damp areas to be avoided during the installation of your new laminate floors.
Once the floor is dry, you can begin laying the planks out on the subfloor to acclimate them to the room. This will take at least 48 hours, so make sure that you have enough time in advance to allow for the acclimatization process.
Before laying the first row, make sure that all the planks have been cut to fit. This will involve cutting them from end to end and retaining a gap for your baseboard molding and other obstacles in the room. This will ensure that you have enough material to work with and that your laminate floors can look as uniform as possible.
To help keep your planks looking their best, you can stagger the seams of each individual piece by about 12 inches. This will add stability and prevent the planks from bowing inward as you install them.
Laminate floors are relatively easy to maintain, especially if you follow the manufacturer’s instructions for cleaning and sweeping. They also are resistant to scratches and dents, which can make them ideal for areas with heavy foot traffic.
However, it is important to note that laminate floors are very sensitive to moisture. If they get too wet, they can warp and swell. To prevent this from happening, you should wipe up spills quickly and avoid allowing water to sit for a long time.
When installing laminate, it’s important to choose the right underlayment. It helps to reduce sound, make the floor warmer and provide cushion. It also helps to fill the gaps between the floor and the planks so that it becomes more comfortable to walk on.
There are many underlayment options available for your installation, so you should choose one that works with the room’s subfloor and budget. Felt and foam are two of the most popular underlayment materials for laminate flooring. They are both eco-friendly and work well for a variety of flooring types. They also come with a moisture barrier to protect the floor from spills and dirt.
If you’re installing your laminate over a concrete subfloor, it’s essential to use a good underlayment that has a vapor barrier. This will prevent water from seeping into the floorboards, which could lead to warping over time.
You can also buy laminate with a pre-attached underlayment, which will save you the trouble of laying two separate products. However, you should still purchase the underlayment separately and install it a single strip at a time, starting with the longest wall in the room.
Most underlayment comes with slightly different instructions on how to install it, so follow the manufacturer’s directions to make sure that you are installing it correctly. Once the strips are in place, you can begin laying your flooring.
It’s best to acclimate your laminate flooring 48 hours before you start laying it so that it can get used to the room’s temperature and humidity. If your floors are not acclimatized, it will be difficult for them to fit together properly and they may become loose over time.
The underlayment that you choose for your laminate floor will depend on the subfloor, your budget and your project. Using the wrong underlayment can cause problems during the installation and could result in the floor cracking or becoming damaged over time.
Underlayment should be at least 2 mm thick to help absorb sound. Depending on your lifestyle and the type of laminate flooring you’re installing, you may want to consider using a higher-density underlayment, such as felt or cork. These underlayments are a little more expensive than foam or plastic, but they offer excellent noise reduction and heat retention.
Laminate planks are a type of flooring that does not need to be glued down and can be installed in most rooms. They are also easy to maintain and provide a durable, long-lasting finish for your home.
There are many types of laminate floors, including wood-look and textured options. The key to selecting the right planks for your project depends on your needs and budget. You should consider the core construction and thickness of each plank and the undertones of your chosen floor’s color palette to choose the best fit for your home.
First, install the first row of planks with the tongue side toward the wall and flush to a corner of the room. This will allow for natural expansion and contraction after installation.
Then, use spacers (small sections of the same board) to hold the flooring away from the wall about 1/4 inch. This will help prevent a gap from developing between the flooring and the wall, which could lead to water damage or cause the boards to warp.
Next, install the rest of the first row using the spacers on the sides and end of each plank, as directed by the manufacturer. This will allow for natural expansion and contraction as the room’s temperature changes throughout the year.
Finally, cut the last plank to a length that ends at least 1/4 inch from the wall. This will give you enough room to remove the spacers and install baseboard molding along the perimeter of the room.
Before installing the floor, you should allow it to acclimate to the room’s temperature for 24 hours. This will allow it to adjust to the room’s climate and help ensure that your new flooring lasts as long as possible.
To disassemble a plank, never lift the end joint up and destroy the click mechanism. Instead, slide the plank apart horizontally at the end joint.
You can then connect the end joints of each plank by placing one end of the next plank flat on the floor and slid it towards the groove of the previous plank. Once the joint is aligned, push down on the end of the plank, and it will lock the long side to the previous row.
Laminate flooring is a great way to bring an attractive floor to your home. It’s inexpensive, easy to install, and durable. It’s also a versatile material that can be used in any room of the house.
Before you begin installing your new laminate floors, it’s important to make sure the subfloor and room are properly prepared. You’ll need a vapor barrier and an underlayment of foam sheeting to support the flooring, as well as prevent moisture damage.
Once you’ve done that, it’s time to start laying your laminate planks. Begin by laying the first row of planks with the tongue side facing the wall and the grooved edge looking out into the room. Then, place the next row of planks by matching the tongues of each row to the grooves of the previous row.
Occasionally, you’ll need to close up the joints between the planks with a hammer and tapping block. Doing so will save the edges of the planks and keep the floor looking neat. If you’re not comfortable with the technique, snap a sacrificial scrap of flooring and tap it into place instead.
For an authentic wood look, select laminate flooring with a wavy grain pattern and color variegation. These features will help replicate the look of natural hardwood, making your room appear more real.
If you’d like a more creative floor design, consider herringbone planks. These are cut in a 90 degree angle and will make your room look more unique.
To ensure a smooth installation, stagger the end joints of adjacent boards by at least 6 inches. This will prevent peaking, in which adjacent planks form an inverted V shape projecting from the floor, and gaps, in which two adjoining boards separate from each other.
In addition, be sure to leave a consistent gap between the walls and the flooring. If the door to your room is on a short wall, use a 3/8-inch spacer along that wall before you begin installing your laminate.
Once you’ve laid all the full planks, you can start covering the edges of the room with transition pieces and baseboard molding. These will cover the expansion gap between the flooring and other floor types, as well as any gaps around the perimeter of the room. These are crucial because they will prevent the floor from buckling and slipping in the future.
What You Need to Know About Roofing Repair
Roofing is one of the most important parts of your home. When it’s in good condition, it can last for years. However, sometimes some problems develop over time that needs to be fixed. If left unchecked, these issues can lead to more serious damage to your roof and the inside of your home.
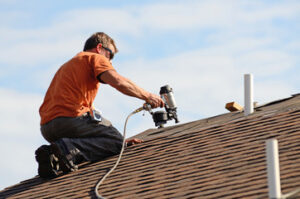 Roofing repair refers to fixing or restoring a damaged or deteriorating roof. Various factors, weather elements, aging, poor installation, and lack of maintenance, can cause roof damage. Common roofing problems include leaks, cracks, missing or broken shingles, damaged flashing, and sagging or warped roofing materials. Roofing repair typically involves identifying the problem’s source, assessing the damage’s extent, and performing the necessary repairs or replacements. Roofing repair requires the expertise of a professional to ensure the repair is done correctly and safely. Regular roofing maintenance and inspections can prevent the need for extensive repairs and prolong the lifespan of a roof.
Roofing Repair costs depend on the amount of work that needs to be done. It will also depend on the damage that needs to be repaired, the materials used, whether a new roof is required, or if a repair can be done. Roofing repairs often involve replacing missing shingles or fixing small cracks in the shingle, which is a much cheaper option than having to replace the entire roof. Generally, the cost of repairing an asphalt shingle roof is around $700. If there is wood rot in the framing surrounding the chimney, the repair cost can increase significantly. A reputable contractor will know how to fix the chimney before repairing the rest of the roof.
Skylights are another common area for leaks, and the price can vary depending on how badly they need to be repaired. A simple leaking skylight will cost between $250 and $550 to fix, but more complicated repairs can be $1,500 or more. When it comes to roofing repair, you need the right materials. Choosing the best material is important because it will determine the lifespan of your roof.
Lighter materials, like asphalt shingles, are less expensive to repair than heavier ones such as wood shakes or metal shingles. These materials are also more durable and will last longer. The cost of a roof repair depends on the size and type of your home. It may be as little as $150 to fix a shingle leak or as much as $700 to replace all the shingles on a large roof.
Roofing repair is important for protecting your home from rain, snow, sun and wind. It also helps keep mold, mildew and moss from growing in your attic.
Roofing is a vital component of your home, and its longevity depends on the materials it uses. However, there will come a time when you will need to have repairs made to the roof in order to keep your property safe and sound.
To get the job done quickly and efficiently, there are some things that you should do beforehand. For example, relocate any furniture that will be in the way, cover up any house plants, and remove unstable items from shelves and walls.
For a minor roofing repair such as replacing a damaged shingle, the process might only take an hour or so. However, a full replacement of your roof will require several days and will include a lot more work. For example, replacing shingles, repairing chimney flashing, and re-flashing your gutters all require the skills of a professional to complete the task. The best way to avoid having to do all these tasks is to hire a local roofing contractor with the experience and expertise required to perform the task correctly the first time around.
Insurance is a great way to get the money you need to repair your roof quickly. However, before you file a claim, it’s important to know what your policy covers and what the deductible is.
Many homeowners policies cover roof damage caused by storms, fire and hail. This coverage can help prevent costly repairs down the road.
Depending on the size of your home and the type of roof material, you may also have coverage for additional weather-related damages such as water damage from internal plumbing or floods.
Before filing a roofing repair insurance claim, homeowners should contact an experienced local insurance agent who can guide them through the process. This person will be able to clarify which insurance providers are best for their unique situation and provide advice on how to maximize potential returns from their investment into roof protection.